Monday, August 27, 2012

ARTICHOKE RICE CAKES WITH MANCHEGO CHEESE


This week our Food Matters Project host is Jen from Small Kitchen College. Jen chose Mark Bittman's recipe for Crisp Rice Cakes with Stir Fried Vegetables and Chicken. Using rice cakes as  my inspiration I went on a web search. When I stumbled on a recipe for rice cakes and artichoke hearts I thought how good would that be? Then I read the recipe and found out that these rice cakes were stuffed with Manchego cheese, one of my favorite cheeses from Spain! Perfect.

My husband and I got hooked on Tapas during our time in Spain last year. I thought this might be a nice addition to our Tapas menu. While this sounded delicious, I have to say that this might be the BEST. BITE. EVER.

Artichoke hearts are sauteed with onion and garlic. Rice is added to the mixture along with hot chicken broth. It was like making a risotto. The recipe didn't say what kind of rice to use and I thought about aborio (as in risotto) but decided it might be too creamy so I used jasmine rice. After it was cooked you add Parmesan cheese and let it sit in the refrigerator overnight. The rice mixture was firm and sticky enough to form a nice round rice patty. Now the fun part, form a golf ball size patty and fill it with manchego cheese. Flatten it slightly and roll it in corn meal. Be sure to use a fine corn meal, I used Masa Harina. The corn meal gives the outside a nice texture and extra flavor and crunch when fried to a golden brown.

Serve these hot. There are so many layers of flavors in each bite topped off by the melted Manchego. I post many recipe that I think are really good but these are at the very top.

Thanks for a great pick Jen. I don't think I would have ever made rice cakes and this combination will be on my tapas menu forever.

For the other members creative takes on the recipe click here.


Artichoke Rice Cakes with Manchego

1 jar artichoke hearts packed in water (not oil)
2 oz butter
1 small onion, finely chopped
1 garlic clove, finely chopped
4 oz rice (I use jasmine)
2 cups HOT chicken stock
2 oz grated fresh Parmesan cheese
5 oz Manchego cheese, very finely diced
3-4 tablespoon fine corn meal (Masa Harina)
olive oil, for frying
salt and ground black pepper
fresh flat leaf parsley, to garnish


Rinse and drain artichoke hearts. Finely chop.

Melt the butter in a pan and sauté artichoke, onion, and garlic for 5 minutes until softened. Stir in the rice and cook for about 1 minute.

Keeping the heat fairly high, gradually add the stock, stirring occasionally until all the liquid has been absorbed and the rice is cooked - this should take about 20 minutes. Season well with salt and pepper, then stir in the Parmesan cheese. Transfer the mixture to a bowl. Leave to cool, then cover and chill for at least 2 hours or overnight.

Spoon about 1 tablespoon of the mixture into the palm of one hand, flatten slightly, and place a few pieces of diced cheese in the center. Shape the rice around the cheese to make a small ball. Flatten slightly, then roll in the corn meal, shaking off any excess. Repeat with the remaining mixture to make about 12 cakes.

Shallow fry the rice cakes in hot olive oil for 4-5 minutes until they are crisp and golden brown. Drain on kitchen paper and serve hot, garnished with flat leaf parsley.

Serves 6


Recipe adapted from InternationalRecipes.net


Sunday, August 26, 2012

FRESH HERB RANCH DRESSING


Ranch dressing made with fresh herbs, so good I could drink this. It's light and herby with a hint of smokiness from the smoked paprika. I made this to serve over a salad with blue cheese and blueberries, but today I'm just pouring this over warm (just picked) vine ripened tomatoes.  Pure heaven.


FRESH HERB RANCH DRESSING

1 cup reduced fat buttermilk
1/2 cup mayonnaise
1 tsp. lemon juice
1/8 tsp. smoked paprika
1/4 tsp. dry mustard
1/2 tsp. salt
1/8 tsp. freshly ground black pepper
1 TBSP. chopped fresh parsley
1 tsp. chopped fresh chives
1 tsp. chopped fresh dill (or 1/4 tsp. dry)

In a medium bowl combine the buttermilk and mayonnaise until smooth. Add in the rest of the ingredients and stir.

Will keep for 1 week covered in the fridge.


Recipe slightly adapted from Simply Recipes.

Friday, August 24, 2012

TOMATO BREAD SALAD WITH CHORIZO AND HERBS


It's our annual summer race. No, I don't mean a 5K or 10K. Our marathon starts in July and runs through October. It's our race to consume (or give away) our tomatoes as they ripen, and to beat the birds who are also waiting for the perfectly ripe tomato on the vine.. This summer it was hotter than usual and the heat wave gave our tomatoes an amazing growth spurt and they are sweeter because of it.

To add some variety to our tomato meals I made this twist on a classic Italian bread and tomato salad called panzanella. Bread and tomatoes are tossed with cooked (cured) chorizo, onions, and fresh herbs. Dressed with Spanish sherry vinegar and oil makes this a perfect summer meal.


TOMATO BREAD SALAD WITH CHORIZO AND HERBS

3 oz. day-old country bread, torn into bite-size pieces, about 3 cups
5 TBSP. extra virgin olive oil
1/2 pound dried (cured) chorizo, cut into 1/2 inch pieces
1/2 cup Spanish onion, finely chopped
1/2 tsp. chopped fresh oregano leaves
1 TBSP. sherry vinegar
3/4 tsp. fine sea salt, more to taste
Black pepper, as needed
2 ripe, juicy tomatoes, about 1 pound, cut into 1 inch chunks, about 3 cups
1/3 cup basil leaves, torn into pieces
1/3 cup packed cilantro leaves

Heat broiler. Spread bread on large baking sheet and toast until just golden, about 1 minute.

In a large skillet, heat 1 TBSP. oil over medium-high heat. Add chorizo and onion; cook until sausage is golden and onion soft, about 5 minutes. Stir in oregano and remove from heat.

In a small bowl, whisk together vinegar, salt and pepper. Whisk in remaining oil. In a large bowl, combine bread, tomato and chorizo mixture. Toss in dressing, basil and cilantro. Let stand at least 15 minutes before serving.

Serves 4-6

Recipe from the New York Times


Monday, August 20, 2012

MEDITERRANEAN LAYERED DIP


It's another week of cooking from Mark Bittmans's The Food Matters Cookbook. This week Megan from Art by Megan chose the recipe Greek "Nachos" with Feta Drizzle. This recipe inspired me to make a Mediterranean layered dip. I made this dip for a party a few weeks ago and it was a big hit. Today I made this dip for two and thought a small glass bowl would be the perfect size and show off the layers. Well, you can see the layers but it was hard to dip into and get a little bite of everything. This dip is perfect the way I made it the first time in a low, shallow dish.


I roasted some tomatoes with garlic and olive oil. Taking the time to roast the tomatoes put this dip over the top. Roasting intensifies the sweetness of the tomatoes. 

This is such a fun recipe. You can use anything Mediterranean that you like. I started with hummus, a layer of pesto followed with chopped olives, chopped cucumbers, chopped tomatoes, and topped with crumbled feta.


Served with pita chips.

For all our members take on this recipe here.


LAYERED MEDITERRANEAN DIP

15 oz. hummus 
7 oz. pesto (any kind)
chopped kalamata olives (or any kind)
seeded and diced cucumber
Feta cheese, crumbled

In a 12" round plate spread a layer of hummus, layer of pesto, olives, chopped cucumber, roasted tomatoes, and crumbled feta cheese. Serve with pita chips.


Sunday, August 19, 2012

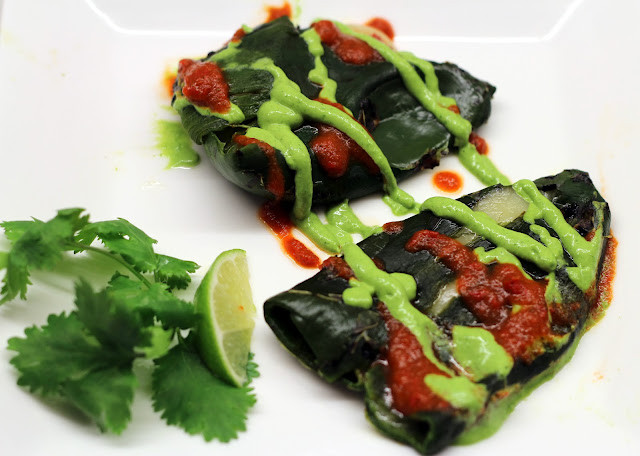
CHILE RELLENOS


These are not your typical Mexican battered, deep fried and delicious chile rellenos. These are your non-greasy, healthy, and even better tasting chile rellenos.

I love making chile rellenos this way. Start with fresh poblano chiles (sometimes called pasilla in stores but if they are a deep green and wide in the middle they are poblanos).

Char them on a grill or gas flame and put them in a plastic or paper bag to steam. After about 20 minutes peel the skin off, cut the stem off and pull out the seeds and pith. I stuff them with a slice of jack cheese and put them in the fridge until lunch or dinner. When you are ready to eat just microwave them for about a minute (until the cheese melts) and serve. I love them this way, especially this time of the year when poblanos are growing in my garden and the Farmer's Market is overflowing with fresh peppers. You really get to taste what a chili should taste like. When I want to make these a little less rustic, I serve them with a Red Chili Sauce and a Avocado Cilantro Cream Sauce. Put your sauces in squeeze bottles and get artistic with your designs.

GRILLED POBLANO PEPPERS

Grill whole poblano peppers over a gas burner or grill until skins are charred. Immediately put them in a plastic or paper bag and close for about 20 minutes. Peel the skin off, remove the stem, seeds, and pith. Stuff each chili with a slice of jack cheese. Heat in oven at 350~ or until cheese has melted, or microwave for a minute until cheese melts.

Arrange on a plate and garnish with Red Chili Sauce, Avocado Cilantro Cream Sauce, and some chopped cilantro on top.

RED CHILI SAUCE

2 red bell peppers, seeds and membranes removed, chopped
1 shallot, peeled and chopped
1 clove garlic, peeled and chopped
1-2 red chilis, chopped
1/4 cup chopped fresh cilantro
1/4 cup chicken broth
Fresh lime juice (to taste)
Salt (to taste)

Combine all ingredients except lime juice and salt in a medium sauce pan over high heat. Bring to a boil. Lower heat and simmer for 15 minutes. Pour into a blender and puree until smooth. Strain through a fine sieve and season with lime juice and salt. Pour into a plastic squirt bottle.

AVOCADO CILANTRO CREAM SAUCE

1/2 avocado
1 small bunch fresh cilantro, chopped
1 clove garlic, peeled and chopped
1 serrano chili, chopped
1 cup sour cream
2 TBSP. chicken broth
Fresh lime juice to taste (about 1/2 lime)

Blend cilantro, garlic, and serrano in a blender until smooth. Do not use a food processor.

Remove from blender, season with salt and lime juice. Pour into a plastic squeeze bottle.


Monday, August 13, 2012

SHRIMP AND MANGO SUMMER ROLLS


It's another Food Matters Project Monday. We have been cooking from Mark Bittmans cookbook now for over 6 months. It's been such a fun project, cooking with so many talented and creative members. This week Alyssa from Everyday Maven chose Mark Bittmans recipe for Summer Rolls with Peanut Sauce. This was the perfect meal for our warm summer days.

My favorite summer rolls have shrimp in them. I have been making them that way for a long time so to switch it up a bit I added fresh, fragrant mango to them. That was a great addition. I like to include cooked bean threads (or cellophane noodles) and plenty of fresh Thai basil, cilantro, chopped lettuce, and mint leaves. A sweet and spicy dipping sauce went well with the rolls and as always I made a peanut sauce. 


Make an assembly line with all the ingredients before starting the rolls. You will need a dish of warm water for softening the spring roll skins. I have made these before using beef inside and beer to soften the skins. They were quite tasty.

When the skin is soft (after about 3-5 seconds) lay it on a cutting board and place 3 shrimp first. Then the rest of the ingredients. Roll it up like a burrito and you are good to go. Please click here for Alyssa's step by step photos for making the rolls. She has also posted Mark Bittmans original recipe on her blog. Click here to see what the other members did with their Summer Rolls.


Shrimp and Mango Summer Rolls

1 3/4 oz. dried bean threads or cellophane noodles
8 Rice wrappers of spring roll sheets (8.5 inches in diameter)
24 medium shrimp, cooked and peeled, tails removed
1 1/3 TBSP. chopped fresh Thai basil
3 TBSP. chopped fresh mint leaves
3 TBSP. chopped fresh cilantro
2  leaves lettuce, chopped
1/2-1 mango, sliced into thin strips (about 1 cup)

Sweet and spicy dipping sauce
Peanut dipping sauce

Bring a medium sauce pan of water to a boil. Boil noodles for 3-5 minutes, or until al dente, drain. 

Fill a large bowl with warm water. Dip a wrapper into the hot water for 3-5 seconds to soften. Lay wrapper flat. In a row across the center lay 3 shrimp, a handful of the noodles, sliced mango, some basil, mint, cilantro, and lettuce. Leave about 2 inches uncovered on each side. Fold the uncovered sides inward, then tightly roll the wrapper, beginning at the end with the lettuce. Repeat with remaining wrappers.

Serve with Sweet and spicy dipping sauce and Peanut dipping sauce.


SWEET AND SPICY DIPPING SAUCE

4 TBSP. lime juice
1 TBSP. rice vinegar
1 tsp. Agave nectar
1/2 tsp. Sriracha sauce
1 TBSP. thinly slice scallion

Combine ingredients together in a small bowl and refrigerate until ready to serve.


PEANUT SAUCE

There are a lot of peanut sauce recipes but this one tastes great and is SUPER quick. It was given to me by a Vietnamese friend.


3 TBSP. Hoison Sauce
1 1/2 TBSP. peanut butter
1 TBSP. water
1 tsp. Sriracha sauce
1 tsp. finely chopped roasted peanuts

Mix all ingredients together and serve with summer rolls or chicken satay.


Tuesday, August 7, 2012

OPEN FACE PATTY MELT


Remember Patty Melts? Back in the 70's they were everywhere. Grilled beef on grilled rye bread, spread with Thousand Island dressing and topped with Swiss cheese and grilled onions. You can still find them on the menu in some diners. 

I had a pound of ground beef. I didn't want a traditional  burger. I just stared into the fridge for what seemed like forever. Then I spotted some rye bread. Who has rye bread hanging around in their fridge? Maybe after St. Pat's day for Rubens but that's about it. Ron bought it. When he shops he always comes home with random things. I call them Rondom things.

Then I thought about Patty Melts, and caramelized onions..and Havarti cheese. Oh YES! This was great.

I started out by caramelizing my onions in a cast iron skillet. Then I grilled an oval shaped beef patty for just about 5 minutes.

 Turned it over and topped it with Havarti cheese and caramelized onions. I put the lid on the grill and let the cheese melt. I buttered one side of the rye bread and toasted it in the cast iron skillet. It picked up a lot of flavor from the onions. When the bread was nice and toasty I spread some Thousand Island dressing on it and topped it with the grilled beef.. This was amazing.

I don't think a recipe is necessary here. It's pretty straight forward. If you need one let me know in the comments.


Monday, August 6, 2012

LEMON BASIL SORBET


This lemon basil sorbet was inspired by week 26 of our Food Matters Project. Jennifer from Simple & Amazing was our host that week and she chose Mark Bittman's recipe for Raspberry Cabernet Sorbet.  I wanted to use what was growing in the garden so I made Lemon Basil Sorbet. Lemon and basil are a great pairing. I hollowed out the lemons for cute little serving bowls. This makes a refreshing dessert or a perfect palate cleanser between courses.

This is a wild card Monday for our Food Matters Project, and we can make a recipe that we missed. I made this for week 26 but had some challenges. I used an ice cream maker and it wasn't cold enough so I had slush. That wasn't too much of a problem because I knew it would freeze in the freezer. The next day it was really frozen...so I took it out to take the picture and write the post but-someone-put my carefully hollowed out lemon bowls down the GARBAGE DISPOSAL!!!!!!!!!

That's okay. I got to make them this week :)

 Check out what the other members made that week here. You can find the original recipe on Jennifer's blog here.

And if you are interested in our members wild card delights click here.


LEMON BASIL SORBET

Makes about 5 cups

3 cups water
2 cups granulated sugar
2 TBSP. lemon zest, divided
1 1/2 cups packed fresh basil (if a stronger basil flavor is wanted, use 2 cups)
pinch of salt
3 cups fresh lemon juice

Prepare a lemon simple syrup with the water, sugar and 1 1/2 TBSP. of the lemon zest by combining all three in a medium saucepan set over medium-low heat. Cook mixture until the sugar is fully dissolved. Remove from heat.

Once the simple syrup is ready, add the basil and salt. Let the mixture steep for 30 minutes. Stir in the lemon juice. Cover and refrigerate 2-3 hours or overnight.

Strain the chilled mixture through a fine mesh strainer. In an ice cream maker, pour the mixture into the frozen freezer bowl and let mix until thickened, about 15-20 minutes. When the sorbet is almost done, add the reserved zest through the opening on top of the ice cream maker and let churn until combined. The sorbet will have a soft, creamy texture. If a firmer consistency is desired, transfer the sorbet to an airtight container and place in freezer for about 2 hours. Remove from freezer about 15 minutes before serving.

Recipe from the Cuisinart Recipe Booklet.