Monday, May 28, 2012

INDIAN STYLE BURRITOS WITH GREEN CHUTNEY


It's Food Matters Project Monday! The recipe we used as inspiration this week was Beans n Greens Burritos. It was chosen by Jacqui at Good Things Grow. Mark Bittman wrote a recipe for a burrito using black beans and kale. He also listed other ideas for filling the tortilla but nothing inspired me. I was thinking about skipping this week until I walked by an Indian restaurant and started thinking about how much I love garlic naan. That thought took me to Kati Rolls. Kati rolls are made with marinated chicken or vegetables cooked on a skillet and then served with green chutney and wrapped in parathas. 
  Parathas are an Indian flat bread and the ingredients are almost like making a flour tortilla.....
flour-salt-oil-water.

BINGO! 

 All I had to do was to decide on a filling.

 I purchased some whole wheat tortillas and made a version of Aloo Chole, Chickpea (garbanzo) Potato Cabbage Curry for the filling. For my "salsa" I made a batch of Green Chutney consisting of fresh mint, cilantro, onion, lemon juice and hot chilies. For all you cilantro haters out there I want you to know that this is great without it. I made it, served it, and while cleaning up I found all the cilantro in the salad spinner. I added it back in but we had already enjoyed our chutney without it.


The Indian spices combined with the potato, tomato, garbanzo beans and crunchy cabbage was a fantastic filling for the whole wheat tortillas. 


A drizzle of Green Chutney inside puts this burrito over the top. We were eating with a fork and knife so I drizzled the chutney on top of the burrito.


Aloo Chole: Chickpea Potato Cabbage Curry

1 lb waxy potatoes, scrubbed and chopped
1 tbsp canola oil
1 onion, diced
2 cloves garlic, minced
1 tbsp ginger, minced
1 chili pepper, seeded and minced (optional)
1 tsp mustard seed
1 tsp cumin seed
1 15 oz can diced tomatoes
1 15 oz can chickpeas
1 tsp chili powder
1/2 tsp garam masala
1/2 tsp turmeric
1 tsp salt
1 small head cabbage (or 1/2 large head), sliced into very thin strips
1. Put the potatoes in a medium saucepan. Cover with water. Bring to a boil, then reduce to a simmer. Cook for 10-15 minutes until tender. Drain and set aside.
2. Heat oil in the bottom of the pot on Medium heat. Fry the onion for 5 minutes, until translucent. Add garlic, ginger, chili pepper, mustard seed, and cumin seed. Fry 1-2 more minutes.
3. Add tomato, chili powder, garam masala, turmeric, and salt. Cook for 3 minutes, until tomato juices are sizzling and starting to evaporate. Add cabbage, fry for 5 minutes, until slightly reduced. Add chickpeas and potatoes. Simmer for 15 minutes. Smash some of the potatoes against on side of pot.

 Recipe from strawberrypepper

 GREEN CHUTNEY  (CHAAT)

2 cups chopped mint leaves
1 cup chopped cilantro
1 large onion, sliced
1-2 TBSP. lemon juice
1 TBSP. sugar
4-6 green chilies
salt to taste

Combine all the ingredients in a blender and blend to a smooth paste. Add a little water to loosen it up so it will blend.

Makes 1 cup.

Recipe by Tarla Dalal

To see what our other Food Matters Project members made click here.

To read the original recipe go over to Good Things Grow.


Sunday, May 27, 2012

LEMON BASIL PESTO


There was something different about the basil at the Farmer's Market this week. It drew a crowd. Everyone was grabbing a bunch and smelling it. It was lemon basil. You could actually smell the lemon scent from a few feet away. I've used lemon basil before but it always had a subtle lemon smell and flavor. This was vibrant. I bought a couple of bunches and knew I had to make pesto. This was so delicious I was eating it by the spoonful.


LEMON BASIL PESTO

2 cups packed fresh basil leaves (I used lemon basil)
2 cloves garlic
1/4 cup pine nuts
2/3 cup extra-virgin olive oil
Kosher salt and ground pepper to taste
1/2 cup freshly grated Pecorino cheese

Combine the basil, garlic, and pine nuts in a food processor and pulse until coarsely chopped. Add the olive oil and process until fully incorporated and to the consistency you like. Season with salt and pepper.

Transfer the pesto to a bowl and stir in the cheese.


I spread the pesto on a piece of Scottish salmon and baked in the oven at 375~ for 20 minutes.


Monday, May 21, 2012

HALIBUT GRILLED IN BANANA LEAVES WITH ORANGE-PINEAPPLE SALSA


It's Food Matters Project Monday. Week 16 as we cook our way through Mark Bittmans Book. This week our host is Sara of food & frederick. Sara chose Mexican-Style Fruit Salad with Grilled or Broiled Fish. This was right up my alley, as I love seafood and we have a early morning Saturday fisherman's market down at the harbor. The boats pull in with their catch and you buy it right off the boat.

I woke up at the crack of yawn to check out the fresh fish.


Somebody else had the same idea.


There were only two boats in and the catch of the day?


Urchins


and crabs.


She was handing out uni samples at 7:00AM ???????????

Not going to work for my Food Matters Project meal.

Not far from the harbor is a very ethnic Market. I haven't ventured in there in years. Wow! It was fun. All the Mexican specialties you could want. Check out the happy meat case.


I spotted some fresh banana leaves and I instantly knew what I was going to do. Grill some halibut in the leaves with a salsa made from oranges and pineapples.


I bought a package of leaves but I ended up with a boat load of leaves. This is only part of them. At least they freeze well. By now the Harbor Fish Market had opened and I loved the look of the Alaskan Halibut. I bought a pound and cut it in half.


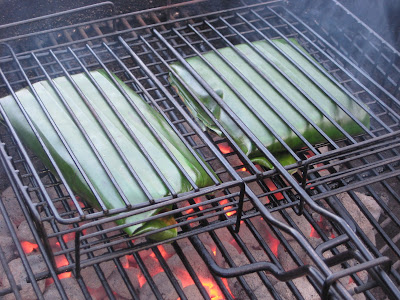
The halibut was seasoned with salt and pepper, a little olive oil and a drizzle of juice from the orange-pineapple salsa. Then you wrap it up like a burrito. You can skewer the ends, tie it up in a little bundle, or put them in a basket like I did.


They were grilled for about 5 minutes per side. The banana leaves seal in the moisture and add a delicious mellow, smoky sweet flavor to the fish. You can wrap other types of fish in the leaves and even grill vegetables this way.


Right off the grill, then served with an Orange-Pineapple Salsa.


ORANGE-PINEAPPLE SALSA

2 limes,  juiced
2 TBSP. freshly squeezed orange juice
1/2 tsp chile de arbol powder (or chile powder if you like it mild)
2 tsp. honey
2 TBSP. extra-virgin olive oil
1/2 ripe pineapple, peeled, cored, and cut into small dice
2 oranges, peeled and cut into small dice
3 green onions, thinly sliced
3 TBSP. chopped fresh mint leaves
Salt and freshly ground pepper

Whisk together the lime juice, orange, chile powder, honey, and oil in a medium bowl. Add the remaining ingredients and stir to combine. Season with salt and pepper, to taste. Let sit at room temperature for at least 30 minutes before serving.

Salsa adapted from a Bobby Flay recipe.


HALIBUT GRILLED IN BANANA LEAVES

Banana leaves cut into squares, washed and soaked in water for at least 30 minutes.
4- 8oz. halibut fillets, skinned
Salt and pepper
olive oil
juice from the salsa

Cut each banana leaf into a 14 x 14 inch square. Place halibut fillet in center of leaf, drizzle olive oil on top and sprinkle with salt and pepper. Pour 1 tsp. of the salsa juice on top and wrap the leaves around the halibut like a burrito. Tie together or skewer the ends closed and grill for about 5 minutes per side. You can also use a grill rack to grill the halibut like the picture above.

Remove from banana leaves and serve topped with the salsa.

For the original recipe as Mark Bittman wrote it please check it out on Sara's blog food & frederick. Then go here for all our groups amazing takes on his recipe.


Sunday, May 20, 2012

CILANTRO LIME BASMATI BROWN RICE


This is my go to recipe for Mexican style rice. It pairs well with Mexican dishes and also Indian dishes. I really like the nuttiness of the basmati brown rice. It's flavorful and healthy. 


Cilantro Lime Basmati Brown Rice

·         1-1/2 cups (1 pound) uncooked basmati brown rice
·         4 cups (1 quart) vegetable broth (low sodium preferred)
·         2 garlic cloves, minced
·         1/4 cup fresh lime juice
·         1-1/2 tablespoons olive oil
·         1/2 to 1 teaspoon kosher salt (or more, to taste, if using low-sodium broth)
·         1-1/2 teaspoons dried oregano (Mexican preferred)
·         1-1/2 teaspoons ground cumin
·         1/2 teaspoon ground white pepper
·         1-1/4 cups fresh cilantro, chopped
·         ½ - 1 jalapeno, finely chopped

Add rice and vegetable broth to 3 quart pan; bring to boil over high heat, give it a quick stir, cover and lower heat to lowest simmer setting. Continue to simmer on low for 45 minutes. Remove from heat and let stand covered for 5 minutes, or until any remaining liquid in bottom of pan is absorbed. Fluff with fork.

While rice cooks, whisk together the garlic, lime juice, olive oil, salt, oregano, cumin, and pepper. Pour over cooked rice, add the cilantro, and lightly toss with fork until combined. Taste and add salt, if desired.

Freezes and reheats well. Rice and broth may be cooked in a rice cooker instead of on stove top. Recipe may be doubled or cut in half.

Recipe slightly adapted from The Yummy Life.


Thursday, May 17, 2012

BETTER THAN AN EGG MCMUFFIN


I have a warm spot in my heart for Egg McMuffins. Or maybe I should say for the inventor of the Egg McMuffin. Herb Peterson invented them here in my home town of Santa Barbara. He was a kind and cheerful man. Always approachable and always humble.


This plaque is on the wall of one of his McDonalds.

I don't eat fast food very often but while I was perusing the net I found a blog that I loved. The Yummy Life has fun, creative, and healthy recipes. Monica posted this recipe but made it healthy by using whole grain English muffins and low calorie cheese. She also mentioned that these can be mass produced making it perfect when feeding a crowd or frozen and quickly cooked for a breakfast on the go.


You spray a large muffin tin with cooking spray and drop an egg in each one.


The eggs are cooked in the oven for about 20 minutes until they are set. I put a grind of pepper on top.


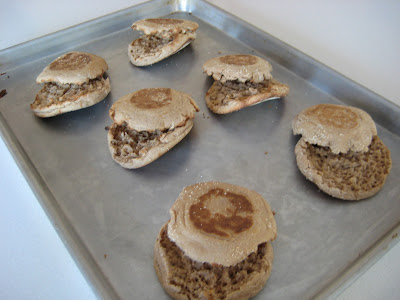
I toasted some whole grain muffins but you don't need to toast them.


 The muffins are topped with cheese and Canadian bacon. I had some Hollandaise left over in the fridge so I spread it on one side of the muffin. Holy Moly...that added some big flavor and put them over the top.


Then you top it with an egg. You can heat these in the oven or the microwave. I put mine in the oven for about 15 minutes and they were perfect.  I have some in the freezer for later and I'll give the microwave method a try later.

These were so good.

BETTER THAN EGG MCMUFFINS


6 large eggs
6 100% whole grain English muffins
6 slices Canadian bacon
6 slices cheese (I used Provolone)
Butter to spread or hollandaise sauce
Freshly ground black pepper

Spray a jumbo muffin tin with cooking spray and drop one egg in each hole. Sprinkle with ground black pepper and bake the eggs in a 350~ oven for about 25 minutes or until set and cooked.

Split open the English muffins and toast if desired. Spread one half muffin with butter or hollandaise. Lay a slice of cheese on top and fold the ends over to make it round. Top with a slice of Canadian bacon and a baked egg. Top with the other half of the English muffin.

Bake at 350~ for 20 minutes.

To freeze, wrap each muffin in foil and place in a freezer bag. Bake at 350~  for 30-40 minutes.

If microwaving wrap each muffin in parchment or wax paper and put in a freezer bag. Microwave if thawed for 40-60 seconds. If frozen, microwave for 3 minutes, turning after each minute.

Recipe adapted from The Yummy Life.

For a really healthy version of this Egg McMuffin and the calorie count go over here and check out the recipe and great details on how to make them and other options.


Monday, May 14, 2012

FRUIT BRUSCHETTA WITH SPUN HONEY


 This weeks Food Matters Project recipe is Bruschetta Rethought. Chef Laura was our host. You can check out the recipe on her blog here. Mark Bittman suggested getting creative with your toppings.

I decided to go to the Farmer's Market for inspiration. I was thinking of a savory topping until I spotted this.


 I had a sample of this special local honey and I knew I had to use this on my bruschetta. With all the fruit surrounding me, I gathered a variety to make a fruit salad.


I chopped the fruit and added some chopped mint.


I decided on a beautiful loaf of Pecan Raisin Bread for my base.

I toasted the bread, spread it with the spun honey and topped it with chopped mixed fruit.


These were amazing.

The spun honey is delicious. It comes in different flavors. Mine had organic vanilla bean in it but they also had a cinnamon and even a chocolate honey.

For some fantastic Bruschetta ideas stop over here and see what everyone else made.

Thanks Laura for a great pick.

Wednesday, May 9, 2012

HALIBUT VERACRUZ


Red Snapper Veracruz is the signature dish of the major port city Veracruz on the Gulf of Mexico.

Veracruz is known for it's abundance of seafood and a rich culinary history which was heavily influenced by the Spanish. The tomatoes, garlic, and onions (and sometimes jalapeno) marry Mexico with the olives, olive oil, and capers of Spain.  And I must say, this is a marriage made in heaven.

It's very low fat, healthy, and a dish that comes together in about 30 minutes. You can use a variety of fish in this recipe. I'm not a fan of Red Snapper which is the more traditional fish used in Mexico, so I use Halibut, Swordfish and Chilean Sea Bass (although the Chilean Sea Bass is now on the avoid list of the Sea Food Watch Guide). My favorite is Alaskan Halibut and that is what I used this time. I didn't use any jalapenos in my sauce because I wanted to taste the halibut in it's pure, delicate state.

This is a perfect dish to make in the summertime when tomatoes are at their peak.


HALIBUT VERACRUZ

3 TBSP. Olive oil
1 medium brown onion, chopped
3 garlic cloves, minced
5 medium tomatoes, peeled, seeds removed, and chopped
10 Spanish style green olives, pitted and chopped (stuffed with pimiento are fine)
2 TBSP. capers
3 Bay leaves
A couple of grinds of pepper
Salt to taste

2 pounds Halibut or other white fish

Heat oil in a large saucepan. Add onion and garlic. Cook until tender but not browned. Add tomatoes,  olives, capers, bay leaves, and salt to taste. Bring to a boil and reduce heat to simmer. Simmer gently uncovered for 10 minutes.

Sprinkle fish with salt and place in skillet with sauce. Cover fish with the sauce and bring to a boil. Reduce heat and cover skillet. Simmer for 10 minutes or until fish flakes easily when tested with a fork.

Serves 6


Monday, May 7, 2012

BRIE QUESADILLA WITH GRAPE SALSA


It was May 5th, Cinco de Mayo. I had the party planned. Mariachi music, Margaritas, and Mexican food. It was also week 14 of the Food Matters Project.

This week Alissa chose Five Quick Salsas for Chips, Dips, and Other Stuff. Perfect! I decided to make quesadillas for appetizers. Queso Fresco and Pico de Gallo. Then I heard some clanking in the liquor cabinet. I already had the margarita fixins out....so????? "Mint juleps" he said. What??? "It's Derby Day and we always have Mint Juleps".

So....it became Bourbon and Brie and a little fancy grape and mint salsa on top.

Just as much fun.


BRIE QUESADILLA WITH GRAPE SALSA

1 cup red or green grapes
1 TBSP. coarsely chopped red onion
1/2 jalapeno
1 TBSP. fresh mint
1 TBSP. fresh cilantro
Juice of one lime
Flour tortillas
Brie cheese ( chilled in freezer for 1/2 hour to make it really easy to slice)
Vegetable oil

Coarsely chop the grapes, red onion, jalapeno, mint, and cilantro. Combine in a small bowl and add the lime juice. Mix well.

Remove brie from freezer and slice (removing rind).

 In a large saute pan, heat enough oil to just cover the bottom of pan. Add tortilla and place cheese over it. A 6" tortilla will use about six 1/2" slices. Cover cheese with another tortilla. When tortilla is golden brown on bottom, flip over and cook until golden on the other side.

Remove from pan and let sit for a few minutes before slicing. Cut into wedges and serve with the grape salsa on top.

For all the other takes on Mark Bittman's recipe please visit here.


Tuesday, May 1, 2012

CRISP KOREAN BEEF SALAD


This just might be my favorite. salad. ever.

It has a secret ingredient in it.

Well, maybe not so secret anymore.


Citron Tea.

 Citron is a fragrant citrus, with a thick white rind and a dry pulp with hardly any juice.  It is mainly used for its outer peel. In Korea the peel, pith, and pulp is thinly sliced and soaked or cooked in honey or sugar to create a chunky syrup. It is similar to marmalade. In Korea it is used as a home remedy for a cold or flu. They drink it as a tea, 1/2 cup of hot water and 1 TBSP. citron tea.

Here in the U.S. it is mostly used in the baking industry, where its peel is often candied for cakes, puddings and sweet rolls.

I used it to make an amazing dressing. This salad is full of healthy vegetables and the thinly sliced beef is coated in corn starch and quickly fried for a delicious, crisp crunch in the salad. Everything with the exception of the beef can be made ahead of time so you can toss this together in no time.

Crisp Korean Beef Salad
makes 2 servings


1/2 lb beef rib eye, very thinly sliced and cut into bite size pieces
Salt and pepper to season
1/2 cup cornstarch
3-4 Tbsp grape seed oil
1/4 lb  thin asparagus
1/2 English cucumber, thinly sliced diagonally
1/4 red onion thinly sliced
1 red chili sliced, optional
arugula (one handful)
1/2 lb any lettuce of your choice

Korean citron dressing :
2 Tbsp soy sauce
3 Tbsp bottled Korean citron tea
3 Tbsp apple cider vinegar
4 Tbsp grape seed oil
1 1/2 tsp sesame oil
2 tsp toasted sesame seeds
a few dashes of freshly cracked black pepper

Bring a small pot of water to a boil, add salt and asparagus, blanch for 20 seconds. Remove from pot and put into a bowl of ice water. Drain. Set aside in the fridge.
 
Keep all the salad greens and lettuce in the fridge to chill as well.

Make dressing by mixing all the ingredients. Whisk well and keep in the fridge.

Season beef slices with salt and pepper. Coat each slices with flour or corn starch.
Heat oil in a non-stick skillet over medium high heat. Add the beef slices and fry until the edges gets crisp and brown, about 1-2 minutes. Flip to the other side and continue to fry. Transfer beef slices onto a plate lined with a paper towel.

Assemble your salad on a plate and place crisp beef slices on top. Drizzle the citron dressing, toss and enjoy.

Recipe slightly adapted from Beyond Kimchee.